Thursday, October 11, 2007

Pico de Gallo


This summer, desperate for a twist on my super-easy pico de gallo (4 ingredients, you know what they are) I started looking for a slightly different take on the traditional pico. But I didn't want it to be TOO different. None of that "made with basil" pico garbage. I ended up finding my recipe in a WONDERFUL cookbook by Mark Bittman - How to Cook Everything. He isn't kidding about the everything. If you need a reference cookbook, it's a great choice. I need a reference cookbook because anytime I go outside of my chicken comfort zone, I have no idea what I'm doing. Mark helps me through those trying times.

I served this pico for the first time at our annual 4th of July party. It was gone in about 3 minutes, so I'm guessing that meant it was good? Anyway, it's not too tough - although the chopping scallions part is rough on eyes - but the reward is worth the onion trauma! I wish I had a picture because this stuff is gorgeous. Maybe next time I make it I will take one - if I don't eat it all first.


PICO DE GALLO
from How to Cook Everything, by Mark Bittman

Ingredients:

2 C cored, peeled, seeded, and coarsely chopped tomatoes
1 C minced chopped scallions (preferred), onion, or a combination
1/2 t minced garlic
2 T freshly squeezed lime juice
Salt and freshly ground pepper to taste
2 stemmed and minced jalapeno or hot red chiles, or to taste, or cayenne or crushed red pepper flakes to taste
1/2 C minced fresh cilantro leaves

Directions:

1. Combine first six ingredients, then taste and see whether you want to add more salt, pepper, or chiles. Stir in about half of the cilantro, then set aside for 1 hour, or cover and refrigerate for up to 1 day.
2. Taste and adjust seasoning, garnish with remaining cilantro, and serve.

Kira's Notes:

I used Roma tomatoes - I like them better. I would also go with the scallions - it sucks to chop them all up but don't worry, it's totally worth it in the end! I go a little longer on the garlic than Mark indicates. The first time I made this I think I used not jalapenos. But it was still very tasty...basically, you just can't screw up this pico. So throw in whatever you like.

Wednesday, October 10, 2007

Butternut Squash Gratin

Since it has FINALLY gotten cold outside - well, not 90 degrees anyway - I'm thinking fall and yummy casserole-type things...like this super-dee-duper-delightful butternut squash gratin! This isn't the easiest recipe in the world, lots and lots of chopping and dicing, and as you might guess with a quick glance down the recipe it isn't fast either. I'm betting that Rachael Ray has a recipe out there for butternut squash gratin in 30 minutes...because she is a compulsive liar...but if you ever stumble upon it, DO NOT BELIEVE HER, THIS DELICIOUSNESS CANNOT BE RECREATED IN 30 MINUTES and DO NOT WASTE YOUR TIME TRYING!!!! So yes, this takes awhile, but it's great for a holiday dinner or even just any night when you have the time. My mom and I made it last year for Christmas dinner and I believe it will be making a repeat appearance! :)

BUTTERNUT SQUASH GRATIN

Ingredients:

1/4 C unsalted butter
4 C thinly sliced onions (about 1 lb)
2 1/2 lbs butternut squash, peeled, seeded, and cut into 1/2 inch cubes
1 t sugar
1/2 t ground black pepper
3/4 C chicken stock (low sodium preferred)
2 C fresh breadcrumbs from soft bread
2 C (packed) sharp white cheddar, grated
1 1/2 T chopped fresh rosemary
1/2 t dried thyme

DIRECTIONS:

Preheat oven to 350. Butter a 13x9x2 baking dish. Melt butter in a large skillet, saute onions until light golden in color (about 8 minutes). Add squash and saute 4 additional minutes. Sprinkle sugar, salt and pepper over squash and onions. Saute until onions and squash carmelize. Spread mixture in prepared dish. Pour chicken stock over mixture. Cover tightly with foil and bake for 40 minutes. **This can be done 1 day ahead - if you do that, reheat in 350 oven for 10 minutes before proceeding.**

Increase oven temperature to 400. Mix remaining ingredients together (hello, cheese!) and sprinkle over squash and onions. Bake uncovered until top is golden-brown and crisp, about 30 minutes. You can always turn on the broiler for a few if you aren't getting the top quite as golden as you would like.

Suddenly, everyone loves squash! :)

Sunday, October 07, 2007

White Chicken Chili

I had this chili for the first time at the home of my parents' very good friends. Their son-in-law had been hard at work in the kitchen making dinner for everyone and boy did he do a great job! My mom begged for the recipe, and so this is Benji's chili by way of Kathy. There's a bit of cilantro, so that makes it just a little tiny bit Mexican. Maybe like 1/16th. And you can make it even MORE Mexican by serving with shredded cheese, sour cream, and tortilla chips. Anyway, it's the best kind of recipe because it tastes like it took you a long time and a lot of effort when in reality... :)

I didn't do a very good job writing down the directions for this recipe - on my piece of paper all they say is "cook onions and garlic, add other stuff," so I am going to try to expand upon that for my (possibly three?) faithful readers! :)

WHITE CHICKEN CHILI
Recipe from Benji Rutgers

Ingredients:

1/4 C butter
1 C diced onions
2 cloves garlic, finely diced
3C chicken stock
4 C cooked cubed chicken (you can use canned chicken for this, but don't try and serve it to Ryan!)
2T fresh chopped cilantro
2t dried basil
1T chili powder
2 15oz cans Great Northern white beans, do not drain liquid
2 roma tomatoes, diced
Salt and pepper to taste

DIRECTIONS:

Saute onions and garlic in butter in large stock pot until cooked through. Add everything else except for the diced tomato. Heat through, simmer for awhile if you want to, cook it until it tastes good I guess! (this is what happens when you fail to write down most of a recipe and you cook mostly by feeling - sorry!). When you are ready to serve, ladle into bowls, adding about a tablespoon of diced tomatoes to each bowl. If desired, add shredded cheese and sour cream. Serve with tortilla chips.

Muy bien! :)

Friday, October 05, 2007

Hot Caramel Apple Cider


If you'd like to recreate the deliciousness of Starbucks Caramel Apple Cider in your very own home and on a large scale, this recipe is for you!! I got this from my friend Amber, who was not previously a fan of apple cider, and she's now won over for life.

HOT CARAMEL APPLE CIDER

Ingredients:

1/2 gallon apple cider (I prefer unpasteurized, but with this recipe it might not matter)
1/4 C caramel ice cream topping and extra for garnish
1/4 C brown sugar
Whipped cream (Redi-Wip is perfect...easy to squirt!)
Cinnamon for garnish
Cinnamon sticks for garnish
OPTIONAL: Crown Royal (wink wink)

Directions:

Bring first three ingredients to a boil. Reduce heat and simmer for 15-20 minutes. At this point, you can transfer it to a crock pot if desired. Ladle into mugs and garnish with whipped cream, cinnamon, caramel drizzle, and a cinnamon stick.

FALL DELICIOUSNESS!!!! :D

Friday, September 28, 2007

Green Beans Ah-mahn-DEEN

I hope that Lisa will still try these green beans even though they share a name with Amandine, the dreaded French exchange student at whose hands Lisa suffered for two entire summers. So although Amandine might not have been a delicious dish, these green beans are very easy and SUPER-tasty.

GREEN BEANS AMANDINE
from Allrecipes.com, submitted by Brenda DuFresne

INGREDIENTS:

1 pound fresh green beans, cut into 2 inch pieces
1/2 C water
1/4 C slivered almonds
2 T butter
1 t lemon juice
1/4 t seasoned salt

DIRECTIONS:

In a saucepan, bring beans and water to a boil; reduce heat to medium. Cover and cook for 10ish minutes until crisp-tender; drain and set aside. In a large skillet, cook almonds in butter over low heat. Stir in lemon juice and seasoned salt if desired. Add beans and heat through.

Kira's notes:

I let the almonds/butter mixture go for quite awhile until the butter was brown butter and the almonds were all toasty and a bit salty-tasting. DELIGHTFUL.

Thursday, September 27, 2007

Laughably Easy Lasagna

I had hoped to post a recipe for Chicken Under a Brick to the blog this week, but unfortunately it seems that Rachael Ray and I have had ANOTHER difference of opinion on what constitutes a complete and informative recipe and so let's just say that Chicken Under a Brick did NOT turn out as well as I had hoped. It tasted good in the end, but it was the "during" that was the problem. In fact, it almost set off my smoke alarm. I maintain that Rachael Ray is a LIAR.

Anyway, I have a very lazy lasagna recipe that is basically foolproof and always comes out delicious no matter what. Which is, RACHAEL, the best kind of recipe. This is a slightly jazzed-up take on my mom's lasagna recipe - thanks Kathy!

KATHY and KIRA'S LAUGHABLY EASY LASAGNA

Ingredients:

1 package lasagna noodles
1lb ground beef or sweet Italian sausage (or mix)
1 jar Newman's Own Roasted Garlic pasta sauce (<--IMPORTANT)
8oz dry curd cottage cheese (or rinse off the regular stuff)
3 C shredded mozzarella cheese
1 C shredded cheddar cheese (or whatever kind you want)
1/2 C grated Parmesan cheese
Handful of fresh parsley, finely chopped

Directions:

Boil noodles. Brown ground beef or sausage; drain grease. Mix ground beef with the pasta sauce. Layer cooked noodles, sauce/meat, mozzarella and cheddar cheese. Put more cheese on the top layer than on the others, sprinkle Parmesan, and garnish with the handful of chopped parsley - evenly distributed. Bake at 350 for 1/2 hour; broil for 5-10 minutes until the cheese on top is bubbly, browned, and yum-o-licious. Cool for a few minutes and serve!

Friday, September 14, 2007

"Nick's" Pizza

There's a place near Indiana University's campus called Nick's...Nick's...something. Nick's Pub? Nick's Hut? Nick's Extremely Shady-Looking Eating Establishment? Not sure. It looks pretty dreadful from the outside. If you try and go to Nick's before an IU sporting event, such as a basketball game, you'd better get there early. It's easy to find Nick's, because you'll see a line forming outside - they only let as many people inside as the restaurant can seat. Which isn't fun during basketball season for those waiting in the freezing Indiana winter. Anyway, once you are waved in, you have to wander aimlessly through the rabbit warren of a VERY CROWDED restaurant trying to find any open table, and then if you happen to find a table, you probably also need to beg some chairs. So after all of that, you'd better hope that their food is good. Well, luckily, it is FANTASTIC. I got a burger, which was good, but after I saw Ryan and his dad's pizza, I regretted my decision. Ryan absolutely fell in love with the pizza. It's very fresh-tasting. So I decided that I was going to try and re-create Nick's pizza in our kitchen. Following is my approximation of what I did - tweak to your tastes!

Sadly I do not have a picture. And that's EXTRA-unfortunate because this pizza was drop-dead gorgeous. Our camera was missing in action, packed already for our vacation, and I didn't want to hunt it down because hey...I was hungry!

"NICK'S" PIZZA

Ingredients:

1 Boboli thin crust pizza shell
1/4 lb sweet italian bulk sausage
1 green Bell pepper, cut into thin 1-inch strips
1 C baby bella mushrooms, thinly sliced
4 green onions, finely diced
3 cloves garlic, finely diced
Pizza sauce to taste (I lazily used Contadina's "Pizza Squeeze," it was actually good)
2ish C mozzarella, mozzarella and cheddar, whatever you want cheese
1/4 C fresh-grated Parmesan cheese

Directions:

Preheat oven to 450. Brown the sausage, drain. Put sausage in a bowl, and mix with garlic and onions. Set aside. In the skillet, sautee the green peppers and mushrooms for about 5 minutes. Remove from heat. Spread pizza sauce on Boboli crust. Arrange sausage mixture, green peppers, and mushrooms on crust. Place crust in the oven for 5 minutes. Remove crust from oven and drench with mozzarella/cheddar/whatever cheese. Top with the fresh-grated parmesan. Place back in the oven and turn on the broiler. Broil (on bottom rack, so your cheese doesn't burn) for 5-7 minutes or until it looks like it's done. Remove, cool, cut, and serve!

Mmmmmmmmmmmmm.

Wednesday, September 12, 2007

Chicken Cutlets with Mushroom Sauce


So this recipe represents a first for me...it's from a "light" cookbook! I usually hate anything that says it's healthy or reduced fat or whatever because sometimes those sorts of recipes just aren't very tasty at all. Because they don't require half a stick of butter, which makes EVERYTHING tasty. Of course, in the picture, you can see that I served this with mashed Yukon Gold potatoes and Green Beans Amandine, neither of which could be classified as anything less than FAT. Anyway, read on for a SHOCKINGLY healthy recipe!!

CHICKEN CUTLETS WITH MUSHROOM SAUCE
from Light and Tasty

INGREDIENTS:

4 boneless skinless chicken breast halves (4oz each)
1 t salt
1/2 t pepper, divided
2 t butter (see, not very much!)
2 T chopped green onion
2 garlic cloves, minced (I used 3...hee hee)
2 C sliced fresh mushrooms (I used baby portabellos)
1/2 C chicken stock
1/2 t dried tarragon
2 t cornstarch
1/4 C red wine or additional chicken stock

DIRECTIONS:

Pound chicken to 1/4 inch thickness. Sprinkle both sides with salt and half of the pepper. In a large nonstick skillet, cook chicken for 4-5 minutes on each side or until juices run clear.

Meanwhile, in a saucepan, melt the butter over medium-low heat. Add the green onion and garlic; saute for 2 minutes. Add the mushrooms and cook until softened, about 2 more minutes. Stir in the chicken stock, tarragon, and remaining pepper. Cook over medium heat until mushrooms are tender.

In a small bowl, combine the cornstarch and wine or additional chicken stock until smooth. Stir into the mushroom mixture. Bring to a boil; cook and stir for 2 minutes or until thickened.

Spoon mushroom sauce over chicken breasts and serve.

Serves 4.


Since this is a HEALTHY recipe, here is some nutrition info:
One serving = 169 calories, 3g fat.

Tuesday, September 11, 2007

Buca's Marinara Sauce

I decided to go ahead and post another recipe for Lisa because, well, first of all, Lisa is the only person who reads this blog. And I appreciate her for that! But also, she already has the Breakfast Stars recipe since I emailed it to her last week. She might not have this one yet though!

This is from my foodie coworker, Amber, and it is supposedly THE very recipe that Buca di Beppo's uses for their delightful marinara sauce. One thing you can count on with a Buca-inspired recipe...LOTS of garlic! This makes A TON of sauce, so don't whip this up for a spaghetti dinner for two. Well, I guess you could, if you were planning on eating spaghetti dinners for two for the entire rest of the week as well. I haven't tried freezing this but I'm sure it would do just fine.

BUCA'S MARINARA SAUCE

Ingredients:

1/4 C olive oil
1 medium red onion, chopped
6 cloves (delightful!) garlic, chopped
2 28oz cans crushed tomatoes
salt to taste
3 T fresh chopped basil

Directions:

Heat olive oil over medium heat inside LARGE saucepan...or even a smallish stockpot (if you need to know how large of a saucepan you will need, pay close attention to the 52oz of crushed tomatoes that you will be adding!!!!!). Saute the garlic and onion in olive oil for 8-10 minutes. Add tomatoes and salt to taste. Bring to a boil, then turn heat down to low and cook for 30 minutes. Remove from heat and add fresh basil before serving.

Note: If you like sweeter sauce (and Amber does, Kira does not) you can add 1-2 teaspoons of white sugar.

Breakfast Stars

Okay, so it's been awhile since I posted anything on this blog. Lisae, my apologies. I am going to start posting recipes again, though, because I have finally learned how to balance my life (meaning work and Zumba...that's not really too much of a life now that I think about it) and so I am sort of cooking again!

I made these last week for a breakfast meeting that Ryan had at our house with some work colleagues. I also brought some in for my group. These are great to make for any breakfast get-together and they always impress because they are (1) tasty and (2) ADORABLE. I didn't think to take a picture of them when I made them last, but hey...with a name like Breakfast Stars, how could they NOT be cute?

BREAKFAST STARS

Ingredients:

1 package won ton wrappers
1 lb sweet Italian or regular sausage
1/2 green bell pepper, diced
1/2 red bell pepper, diced
3 green onions, sliced up really really small
2 C colby cheese, shredded
1/2 C ranch (or lite ranch, I guess) dressing

Directions:
Preheat oven to 350. Spray mini muffin tins with cooking spray. Arrange won ton wrappers in mini muffin tins, folding them so that they look sort of like stars but still have room to scoop filling in the center. Bake for 5ish minutes until they are slightly browned and beginning to get crispy.

While the won ton wrappers are baking, cook sausage until no longer pink and drain. Mix sausage with the rest of the ingredients. Scoop filling into won ton wrappers - I used a teaspoon - and bake for 6-7 minutes until mixture inside is bubbly.

Serve as quickly as possible! These are good cold even hours later, but let's just say that they are much better when the won ton wrappers are still crispy. Mmmmmm....

Note: If you are lazy (like me) you can always make the sausage/veggie/cheese/ranch/fatty goodness mixture the night before and refrigerate!

Saturday, December 09, 2006

Soft Gingersnaps

It's almost Christmas, so I decided to get into the cookie-baking mood!! And I'm not talking place and bakes here. That's what I do the other 11 months of the year. No...this time of year, I want my soft chewy gingersnaps! All the ginger, none of the snap. Perfect!

A guy I dated my freshman year in college was pretty unspectacular in every way EXCEPT his mother made THE BEST soft gingersnap cookies I have ever tasted. And although she didn't really like me that much, because she had a really creepy Electra complex and was secretly in love with her son (at least that's what I told myself), she made them for me a few times and I will never forget how delicious they were.

Sadly, this is NOT her recipe. I'm sure she keeps it under lock and key and her gingersnap recipe, although amazingly fantastic, certainly wasn't worth marrying her son. So, I'm making do this Christmas with the following recipe...don't worry, though, they are still pretty good...Ryan has already eaten about 5!

SOFT GINGERSNAPS
From Shawn Barto, www.allrecipes.com
Yield: 66 cookies (more or less)

1 1/2 cups butter (no substitutes), softened
2 cups sugar
2 eggs
1/2 cup molasses
4 1/2 cups all-purpose flour
3 t baking soda
2 t ground cinnamon
1 t ground ginger
1 t ground cloves
1/2 t salt
1/2 t ground nutmeg
Additional sugar

In a mixing bowl, cream butter and sugar. Add eggs, one at a time, beating well after each addition. Beat in molasses. Combine the flour, baking soda, cinnamon, ginger, cloves, salt, and nutmeg; gradually add to creamed mixture. Refrigerate for 1 hour or until dough is easy to handle.

Roll into 1-in balls; roll in sugar. Place 2 inches apart on ungreased baking sheets. Bake at 350 for 8-12 minutes * or until puffy and lightly browned. Cool on baking sheet for 1 minute before removing to wire cooling racks.

YUM!

* When I am making 2 sheets of these, I leave the top sheet in for 8 minutes and then let the cookies stay on the sheet for 1 extra minute after I take them out. The bottom sheet stays in for 9 minutes but I still give those the extra minute on the sheet after they are out. After the extra minute, I remove them from the sheet and place them on cooling racks. My oven runs hot, but I would think that if you leave these in the oven any longer than 9 minutes you are going to start getting crunchy cookies...if that's what you like, great...but since this is a recipe for SOFT gingersnaps, it's probably not what you're looking for! :)

Friday, November 24, 2006

Blueberry Delight

I haven't been posting anything lately because we've been so busy that I haven't had a chance to cook anything new or cool. I have relied heavily on frozen vegetables and Chicken Kiev...not post-worthy. But, luckily for my struggling blog, I did try a new pie for my mother-in-law this Thanksgiving! I also made chicken and noodles for the first time, so I will post about that one later.

A few weeks ago, Janie told me about a pie that she used to love when she was a little girl that had cream cheese, sour cream, and blueberry pie filling on a graham cracker crust. She said that she used to request it on her birthday and other special days and it was just SO good. I thought it sounded gross, because I have an issue with cream cheese, but I went home and looked up a recipe based on those ingredients figuring that even if I thought about half of the ingredients were disgusting that I could still make it for her. What I found was a recipe for "Cherry Cheese Pie." You can use either cherries or blueberries with it, and Janie said that the pie I took to Thanksgiving reminded her also of Cherry Delight, so I've renamed the recipe. I'm sure you can see why - Cherry Cheese Pie sounds disgusting :) She really liked it, and said that although she hadn't eaten it in years and years, she thinks it was exactly what her mom used to make. So that was worth my squickiness about the ingredients. Anyway, here it is.

BLUEBERRY DELIGHT

2 8oz packages cream cheese (softened)
1/2 C sugar, plus 2 T for later
2 eggs
1/4 t almond extract
1/2 C sour cream
1/2 t vanilla extract
1 21 oz can blueberry (or cherry) pie filling
1 8-inch graham cracker pie crust

Preheat oven to 325. Combine cream cheese, 1/2 C sugar, eggs, and almond extract in a medium-sized mixing bowl. Beat with an electric mixer on medium/high speed until smooth and fluffy.

Pour mixture into pie crust.* Bake at 325 for 35 minutes or until set.**

Mix sour cream, 2 T sugar, and vanilla in a small bowl. Spread over pie. Bake for 5 more minutes at 325.

Cool pie to room temperature, then refrigerate until ready to serve.

Spoon pie filling over individual pieces prior to serving.

* It looks like you're going to overflow the pie crust, but this is okay. You won't. When I tried this recipe , I still wasn't entirely clear on when the fruit was added, and as a result was freaked out that it wasn't going to work and I would have to start over, etc...luckily, everything turned out okay.

** I had to bake it for about 40 minutes to set, and my oven runs hot. I checked to see if it was 'set' by seeing if it still jiggled in the middle when I wiggled the pie pan. Jiggly in the middle is bad.

Sunday, November 12, 2006

Parmesan-Crusted Chicken - Or, Rachael Ray is a Liar


This recipe is, indeed, from Rachael Ray. And I think that she is probably a very honest person in general, but if you make this recipe as directed you will end up burning down your kitchen. As did I the first time I attempted the parm-crustedness. I made this tonight for the 4th time and it finally turned out exactly how Rachael said it is supposed to, all goldeny-gooey-crusty-crispy on the outside and tender on the inside. So don't be discouraged if your first try or so isn't that stellar...practice makes perfect :) I will share some of my parmesan-crusted chicken warrior tips with you, though, so that maybe you can avoid some of my tragic mistakes!!

PARMESAN-CRUSTED CHICKEN with TOMATO-BASIL GARNISH*
From Rachael Ray, modified by Kira
Serves 4

4 (6-8 oz) boneless skinnless chicken breasts
2 C shredded (not grated) parmesan
4-5+ T olive oil**
4 plum Roma tomatoes, seeded and chopped
15-20 fresh basil leaves, rolled and thinly sliced (chiffonade)
Coarse ground pepper to taste
A teeny pinch of salt for the garnish (optional)

Roll out a 1-2 foot piece of waxed paper or aluminum foil near the stove top. Add 4+ T (about 4 turns of the pan) of olive oil to a nonstick skillet*** and begin to heat the skillet - it must be very hot when the chicken is added.

Pile the shredded parmesan **** on the work surface you created with the waxed paper or aluminum foil. Season the chicken breasts with black pepper but no salt - the parmesan cheese adds enough salt to the taste of the dish.

Press the chicken breasts firmly into the cheese, coating both sides of the breasts with as much cheese as possible. Set breasts into the skillet and cook 7 minutes on each side, until cheese forms an even, golden casing around the tender chicken breasts.

While the chicken cooks, combine chopped tomatoes with basil in a small bowl. Add a splash of olive oil to the mixture and combine with your fingers for maximum flavor release from the tomatoes. Season to taste with pepper and salt.

Drain any excess oil from chicken as you remove it from the skilled. Top chicken with big spoonfuls of raw sauce.

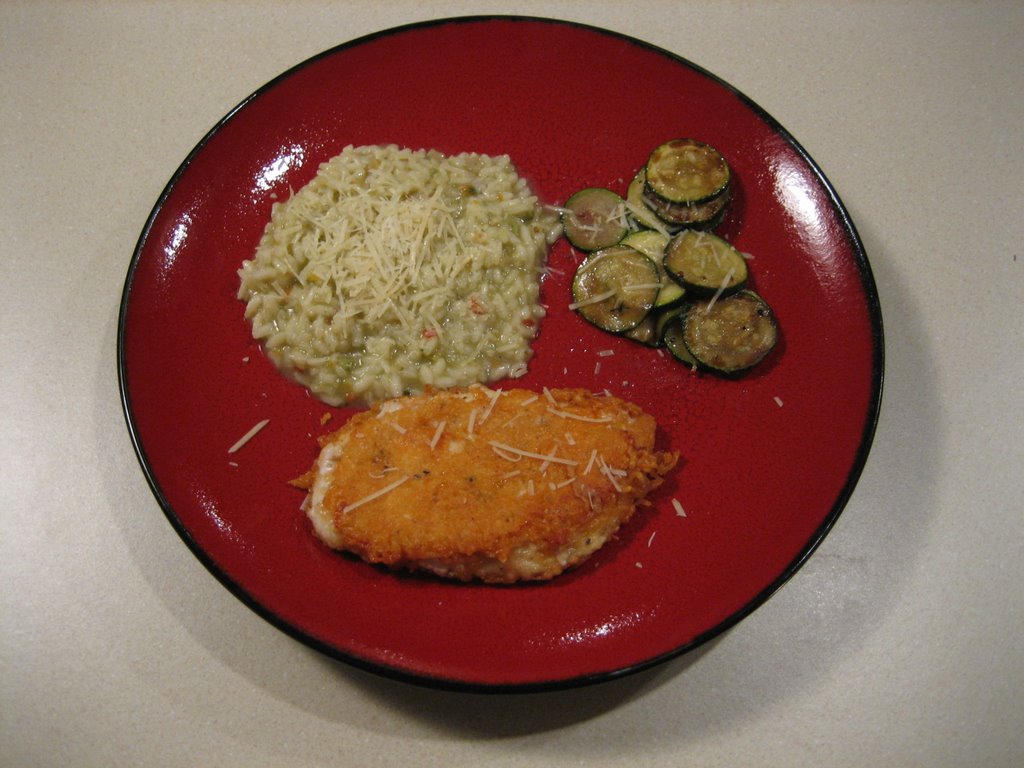
* Ryan doesn't like the garnish so that's why it is mysteriously missing from the picture that I took of tonight's dinner. I like the garnish quite a bit, but I was too lazy to whip it up for just me. In case you are curious, the other stuff is garlic risotto (from a box, but I did use 1/2 chicken stock and 1/2 water) and sauteed zucchini.
** Rachael says that you only need ONE tablespoon of olive oil for the chicken. THIS IS A LIE. You will need about 4 turns of the pan.
*** Interestingly, she also tells you to heat the nonstick pan "very hot" prior to adding the oil. There are a few problems with this. First, I have heard from several reliable sources that if nonstick pans are going to release toxins, they do it when they are heated with nothing in them. Secondly, if you put cold oil into a hot pan, it tends to SMOKE. A lot. Trust me on the smoke thing.
**** You will probably have some leftover parmesan. While I don't recommend eating it straight up, since it's covered in raw chicken, you can drop little globs of it into the oil while the chicken cooks. They will cook into delightful little parmesan crispies that you can then snack on while you wait :) Or put on a salad or something...if you don't eat them all first!

Thursday, November 09, 2006

Buttery Garlic Chicken - Or, Baked Chicken Ryan Likes

I did a midstream dinner switch tonight.

I was going to make Parmesan-Crusted Chicken (a Rachael Ray special) but then I realized that I didn't have any roma tomatoes and basil for the garnish and I didn't want to eat it on spaghetti with icky Ragu since I also was too lazy to make my own marinara - so instead, I fell back to what has very recently (since I have only made it 3 times) become a quick and easy dinner standby: Buttery Garlic Chicken.

This dish is perfect because it combines 3 things that I absolutely ADORE. Mostly butter, then garlic, and then of course chicken. If I had to rank them. And, of course, three things that I have on hand. The first time I made this I didn't tell Ryan that you have to broil the chicken, because he has this issue with chicken that comes from the oven. I figured that if he didn't know that was how I cooked it that he would try it, like it, and then he could finally check his baked chicken baggage. But he found out...luckily he took a bite anyway and just as I had hoped, fell in love.

Oh and by the way, in case the title didn't clue you in - this is NOT healthy. You may have noticed a buttery theme running through this cooking blog. I don't make EVERYTHING with butter, but it probably seems that way! I am, of course, a disciple of Paula Deen. :)

BUTTERY GARLIC CHICKEN
from The Best of Everyday Cooking, tweaked by Kira
Serves 4

4 boneless skinless chicken breasts
1/2 C butter, softened but not melted
3 cloves garlic, minced *
1 teaspoon dried parsley **
1/4 teaspoon dried rosemary
1/4 teaspoon dried thyme

VARIATION: Omit sage and butter and use 1/4 C lime juice for a "refreshing citrusy taste."

Preheat broiler. Trim fat from chicken. If chicken breasts are whole, split them to make them thinner. Line a broiler pan with foil. Place chicken in the prepared pan.

Combine butter, garlic, and dried herbs; mix well. ***

Place 2-3 small dollops of herb butter on each chicken breast.

Broil chicken ****, turning and smallish-dolloping frequently with with remaining butter herb mixture, until juices run clear when thickest portion of meat is pierced with a knife, about 15 minutes. *****

* I'm not sure why they say "minced" here. Everyone (even me, the dangerously inexperienced cook) knows that garlic butter is best when the garlic is run through the garlic press...maybe the technical term for that IS minced, but I prefer "smooshed."
** To be honest, I have never made this recipe as directed. The first time I made it I veered from the recipe because I realized in medias res that I didn't have any of the dried herbs that it called for - oops. I was forced to substitute, so I closed my eyes, thrust my hand into my spice cabinet, and came out with a bottle of dried garlic, basil and sundried tomato pesto mix. Let's just say that works VERY well. So really, any dried herbs that you like will be delish.
*** This is my FAVORITE part, surprise surprise. I eat this mixture prior to putting it on the chicken by slathering it onto tiny wedges of fresh parmesan. Which gives me wicked garlic breath. But it is SO SO good!!! Usually I make too much (oops!) so that I can have some extra butter to, um, snack on later. Yes, I am going to die of a heart attack when I am 35.
**** Interestingly, the recipe does not remind you that when you broil things, you should always do so with the oven door ajar. You know, ajar to where it stays open, about 6 inches. I learned that THIS WEEK. From a Wikipedia entry on broiling. Aack. The first time I made this I didn't know about the whole oven door ajar thing and nothing bad happened, but the second time...let's just say my kitchen smelled like torched butter for about a week and I was exhibiting symptoms of smoke inhalation. When I made this tonight I left the oven door ajar and they were perfect, no smoke. Also, in my ancient windowless oven, that makes it easier to see them - you can watch the butter melt. And as a special bonus you can see and hear the fireworks that ensue when the splatters of butter hit the heating element. Like PopRocks!
***** The 15 minutes is total time, not broiling time. So you don't need to stop the timer every time you take them out to turn them. Especially if the breasts are on the thinner side...they might get pretty parched in there for the whole 15. Just check them before you eat them - I don't want to be responsible for you getting poisoned! :)

Monday, November 06, 2006

Mashed Potatoes to Impress...

I love mashed potatoes. Who doesn't? I made this Mashed Potato, Cheese, and Chive Gratin tonight as a "test drive" for Thanksgiving. It's not the brightest idea to have Thanksgiving (or another holiday) be your first try at a recipe - especially when you are cooking for your husband's persnickety extended family.

This recipe is from Epicurious.com, and was sent to me by my foodie friend Amber. She made these last year for a holiday and said they were fantastic. After making them myself, I am a believer! Ryan said - "These are the best homemade mashed potatoes I have ever had." And he is somewhat persnickety. So...whip these up on a chilly winter night. Mmmmmmm :)

MASHED POTATO, CHEESE, AND CHIVE GRATIN
From Epicurious.com, tweaked by Kira
3 1/2 pounds russet potatoes, peeled, cut into 1-inch cubes
1 8oz package cream cheese, room temperature *
1/2 sour cream
1/2 cup whole milk
3/4 cup chopped fresh chives (about 3 bunches) **
1 tablespoon chilled butter, cut into small pieces
Grated parmigiano-reggiano or parmesan cheese ***
Salt and Pepper to taste

Butter 6 to 8 cup ovenproof dish. Cook potatoes in a large pot of boiling salted water until
tender, about 12 minutes. Drain potatoes; return to same pot. Add cream cheese and mash well. Mix in sour cream and milk, then chives. Season with salt and pepper. Spoon potatoes into prepared dish and dot with chilled butter (Can be made 2 hours ahead; let stand at room temperature).

Preheat oven to 375. Bake potatoes until heated through and beginning to brown on top, about 30 minutes.

* If you are halving this as I did for tonight, Philly Cream Cheese makes these darling little 3oz packages that are just perfect! I used one of those and then tossed in a few tablespoons of butter to make up the rest. I have to admit to a weakness for butter in my mashed potatoes.
** I used scallions because the ghetto grocery store next to the Y did not have (!!) fresh chives. The scallions were great, though, and contributed toward these tasting somewhat like sour cream & onion potato chips. That's a good thing!
*** I added some freshly grated parmigiano-reggiano cheese both to the mixture (add it after the chives) and then to the top after the potatoes were in the baking dish. The parm-reg has a really fantastic nutty flavor that complimented my "chives" nicely.

Thursday, November 02, 2006

Pumpkin Chocolate Chip Squares - Or, I Need a Shopping List

Another pumpkin recipe? Yes. Because it is Fall and it's COLD and pumpkin is oh-so-seasonal. Plus, this recipe is fantastic! Thanks to Lisa for the link :)

I knew that I would have to make a trip to the grocery store before making the pumpkin chocolate chip squares as I was missing (1) unsalted butter because let's face it, the unsalted kind doesn't taste good straight-up, (2) pumpkin pie spice and (3) chocolate chips. So I managed, through a massive effort, to drag my butt off of the couch and head to Wal-Mart after I ate a delicious dinner of cold pizza from Tuesday night. It really was delicious, I love cold pizza.

Anyway, I got to Wal-Mart and immediately grabbed the pumpkin pie spice, chocolate chips, and an extra can of pumpkin just in case what I had left over from the muffins wasn't enough (it was). I then went to wait in what had suddenly become extremely long lines for the "20 Items or Less" lanes.

After getting to the register, I looked at my 3 items and realized that I had forgotten the butter. I was paralyzed for a moment and couldn't decide whether I should just buy the stuff I had and use salted butter (gasp!) or just go to another store and get the butter because well, it's kind of embarrassing to get all the way to the front of the line and then have to jump out. Indecision indecision indecison indecision "Um, can I please leave these with you for a minute? And come back to your line? I forgot something." The cashier was terribly confused but he said "Okay" and I ran to the dairy section. Of course when I came back the line was a lot longer but I waited patiently and read the butter package. Which was semi-educational, actually. I learned that 1 tablespoon of butter has 100 calories. Holy sh*t.

At last I left Wal-Mart and came home. I started the prep part of the recipe, which includes lining a pan with foil. I got all the way up to the vanilla and realized that I didn't actually have any. I searched my cupboards anyway just to make sure, but the only thing I found was peppermint extract. Which would NOT have been an appropriate substitute. I was so ticked at myself. Why didn't I do an inventory BEFORE I went to the store? And then write a list? Ha. I don't need lists. Oh wait...

Ryan went out and got the vanilla for me. He's the best. I guess he figured it was the least he could do since he'll be eating probably 9/10ths of these squares tonight and tomorrow :)

PUMPKIN CHOCOLATE-CHIP SQUARES
Makes 24
From Martha Stewart by way of Lisa

2 C all-purpose flour (spooned and leveled)
1 T pumpkin pie spice
1 t baking soda
3/4 t salt
1 C (2 sticks!) unsalted butter, room temperature
1 1/4 C sugar
1 large egg
2 t vanilla extract *
1 C canned pumpkin puree
1 12 oz package semisweet chocolate chips

1. Preheat oven to 350. Line bottom and sides of a 9x13 baking pan with foil, leaving an overhang on all sides. ** In a medium bowl, whisk together flour, pie spice, baking soda, and salt; set aside.
2. With an electric mixer ***, cream butter and sugar on medium-high speed until smooth; beat in egg and vanilla until combined. Beat in pumpkin puree (mixture may appear curdled). Reduce speed to low, and mix in dry ingredients until just combined. Fold in chocolate chips.
3. Spread batter evenly in prepared pan. Bake until edges begin to pull away from sides of pan and a toothpick inserted in center comes out with just a few moist crumbs attached, 35-40 mins. Cool completely in pan.
4. Lift cake from pan (using foil as an aid). Peel off foil, and use a serrated knife to cut into 24 squares.

* 2 teaspoons vanilla is too much for me in this recipe. Next time I'm going to cut it way down or maybe even not use any. However, if you like vanilla, you'll want the whole amount.
** If you have it, use heavy-duty aluminum foil. It's a lot wider and basically indestructible.
*** This recipe isn't kidding about the electric mixer. You will NEED it.

Wednesday, November 01, 2006

Raw-Fried Potatoes


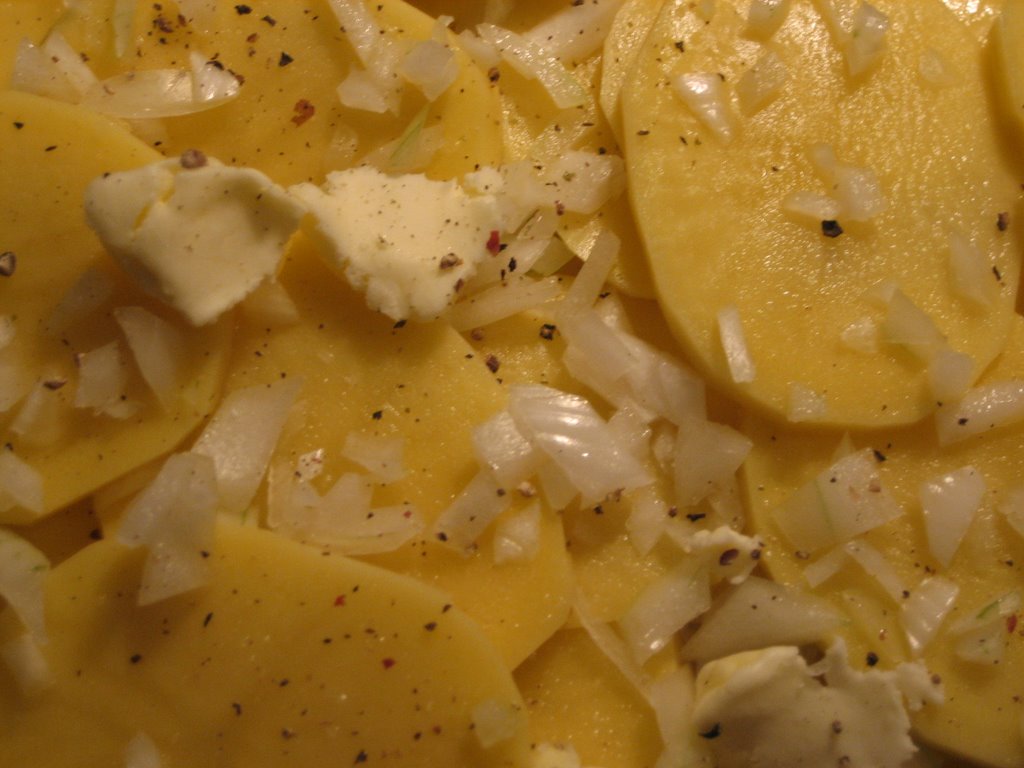
Yes, that is indeed a gigantic glob of butter that you see! Tonight's illustration is of the raw-fried potatoes BEFORE they were fried. If I figure out how to post 2 pictures I will add the one I took after...and you won't even be able to tell much difference, except for some (oops) scorch marks on the potatoes. Hence, "raw-fried."

I made raw-fried potatoes tonight because (1) they are easy (2) they go well with storebought rotisserie chicken and (3) I had Yukon Gold potatoes and I don't like to straight-up bake those. I kind of burned them, and I think I did something wrong with the onions, and ALSO I realized near the end when the potatoes weren't quite tender enough that I was probably supposed to be covering them and...these work a ton better in a very heavy skillet. Which I do not have. No, I did not register for Le Cruset. Mistake? Sigh.

My mom made these when I was a kid and I did not call her to ask for the recipe, because these truly are very easy - I just went along with what I remembered from when I used to cook these at home, in my mom's Le Cruset. Probably with the lid on. So, forgive me if the recipe is a little (okay totally) approximated. But...when you consider that I (1) didn't have an actual recipe, (2) didn't have the right kind of pan, (3) didn't use a lid last time I made these OR most of this time and (4) chopped up the onions like a Wusthof-wielding preschooler... Well, guess what? They still tasted pretty darned good. I was shocked. So, knowing that, you may be tempted to go for it.

Raw Fried Potaotes
Serves ?
From Kira's head...yikes.

Potatoes *
1/2 a sweet yellow onion, chopped or diced or just no longer whole. The potato to onion ratio should be about 4 potatoes to 1/2 an onion
Salt to taste
Pepper to taste
Other Spices to taste **
3 T stick butter, solid and cut into small squares ***

Slice potatoes somewhere in between slab and potato chip thickness. Cover bottom of a preferably heavy skillet with a layer of potatoes. Toss some onions over the potatoes. Drop a few squares of butter into the mix. Toss in a little salt, pepper, and Other Spices to taste. Repeat until you're out of potatoes, onions, and butter (but NOT salt, pepper, or Other Spices!). Cover and cook on medium to medium-high heat for about 10 minutes. Remove cover and flip potatoes. At this point, if you feel the need to add more butter, do so without guilt. Cover and cook for another 10ish minutes, or until the potatoes are tender. Scorched bottoms optional!

* Good potato choices: typical Idaho bakers or, if you're feeling sassy, Yukon Gold
** Oregano is good for a little dash of "hmmmm...what is that?"
*** I prefer to pinch mine off because then I can lick butter off of my fingers - only if there aren't guests eating, of course

Yum........even if you cook them uncovered in a nonstick skillet and burn the bottoms. Recipe forgiveness is a beautiful thing!

Tuesday, October 31, 2006

Trick or Treat - Pumpkin Muffins


Tonight marks the first ever time that I, Kira, am actually handing out trick or treat candy from my very own home. Ryan and I bought about 10,000 pieces of candy so hopefully we'll have a small army of trick-or-treaters but in reality I am sure we will be snacking on slightly stale Snickers bars for weeks and months to come.

Baking is not my strong suit, but I am trying to get better. I am working towards being a better baker in the following ways:

1. I no longer take multiple spoonfuls of batter with the same germy spoon during cake and cookie preparation
2. I bought a flour sifter
3. I have one of those pastry-masher-cutter-inner things
4. I have made my own lemon glaze TWICE in the last 6 months

I have a long way to go.

Anyway, this punpkin muffin recipe is an all-star favorite of mine from childhood. It's from the venerable Kinder-Krunchies cookbook that was originally published by Discovery Toys in 1982. I used to make these constantly. They are, probably, the only thing I can say that I can really bake with any sort of skill and consistency. Hopefully tonight they will be good!

PUMPKIN MUFFINS
From Kinder-Krunchies, 1982

*The recipe has been tripled to make 18 muffins*

2 1/4 C flour
3/4 C honey
3/4 t salt
3 t baking powder
3/4 t cinnamon
3/4 t nutmeg

Mix above ingredients.

Add...
3 eggs
6 T milk
3/4 C solid pack pumpkin
3/8 C butter (softened)

Mix well and spoon into muffin tins. Bake at 400 degrees for 20 minutes.

Enter in baking contest at your junior high and get beat by your "she's a natural" friend's dazzling pumpkin pie with the maple leaf crust cutout on top! :)